DVID Writeup 01 - Hardware - Find the Datasheet
If you’re not yet familiar with the Damn Vulnerable Iot Device (DVID) project, I encourage you to read the project presentation page.
Goal of this challenge
Read the password transmitted on the microcontroller pin PD1 of the DVID board.
Identifying the microcontroller
First things first, we’ll take a look of what the board looks like. We can do this by looking at the Gerber files in the DVID/build folder of the github project. These files contains the schematics of the board.

On the board schematics, we can see a PDIP socket for an ATmega328p chip. Looking for the datasheet online for this chip and we find that it is an 8-bit AVR Microcontroller with 32K Bytes In-System Programmable Flash.
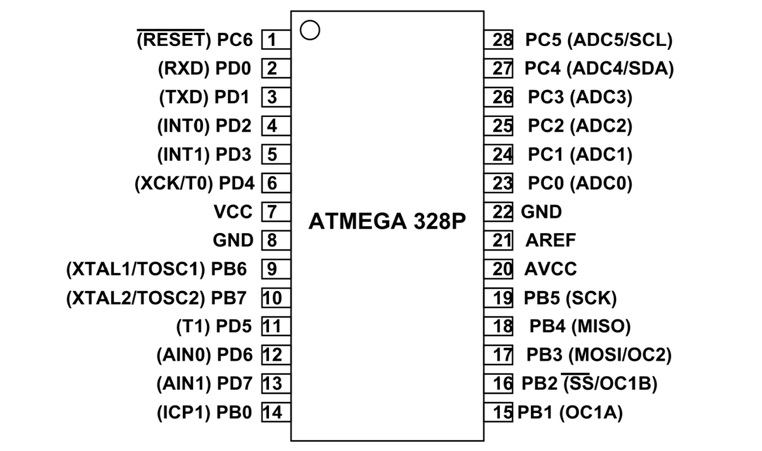
As we can see from the pinout schematic of the ATmega328p chip, the PD1 port is located on the third port, starting at top left of the chip. On the DVID board, this pin is connected to SoftFlah TX port (also named Custom Port #3 depending on the board).
Now that we have identified the port used to transmit the flag, we will flash the firmware on the board.
Flashing the board
First things first, we are going to flash the firmware for this challenge onto the DVID board. In order to do this, we will use avrdude and an USB AVR programmer.
avrdude options | |
|---|---|
-F | Override invalid signature check. |
-v | Verbose mode |
-p atmega328p | Target microcontroller type, here we have an ATmega328p |
-P /dev/ttyUSB0 | Specify connection port, in this case the device /dev/ttyUSB0 |
-c usbasp | Specify programmer type to use. |
-u | Disable safemode, default when running from a script. |
-U flash:w:firmware.hex | Memory operation specification <memtype>:r|w|v:<filename>[:format]. Here we write (w) on the flash the file firmware.hex |
Summing up all of this, I have made this nice flash.sh script :
#!/bin/bash

if [[ ! -d "./DVID/" ]]; then
    git clone https://github.com/vulcainreo/DVID
fi

pushd ./DVID/trainings/hardware/findTheDatasheet/
avrdude -F -v -p atmega328p -P /dev/ttyUSB0 -c usbasp -u -U flash:w:findTheDatasheet.ino.arduino_standard.hex
popd
Now, we will connect the DVID board to our computer using the USB AVR programmer, and start the script. When the AVR programming has completed, the board should restart and you should see this :

Solving the challenge
In order to read the password we will connect a USB UART reader RX pin to PD1 pin on the chip. As we have seen before, We will connect RX pin of the USB UART reader to custom port #3.
| DVID board side connection | USB UART reader side connection |
|---|---|
 |  |
In order to read the data coming from the USB UART reader we can either write a python script, or use tools like minicom. We’ll try with a classic bitrate of 9600 bps.
Python script :
We can write a python script to read the UART values :
#!/usr/bin/env python3

import serial

s = serial.Serial("/dev/ttyUSB0", 9600)
while True:
    print(s.read())
Or we can also use minicom :
Minicom :
minicom -D /dev/ttyUSB0 -b 9600 |
|---|
 |
Additional references
- DVID Project on Github : https://github.com/Vulcainreo/DVID
- DVID Project site : http://dvid.eu/
- http://ww1.microchip.com/downloads/en/DeviceDoc/Atmel-7810-Automotive-Microcontrollers-ATmega328P_Datasheet.pdf